REBUILDING FRONT BRAKE CALIPERS
A motorcycle is a compilation of many systems. Each of these
systems is important and for me I hold the tires and brakes as equal in
importance. The parts shown here are off a 1985 Honda VF00C with 75,000 miles
of minimal maintenance. The bike, weathered and dirty, is complete, straight,
and runs quite well, so the owner is justified in spending money to repair an
older bike.
We put a new tire on the rear, changed and flushed the
coolant, rebuilt the front forks, and lastly, rebuilt the front brakes. The
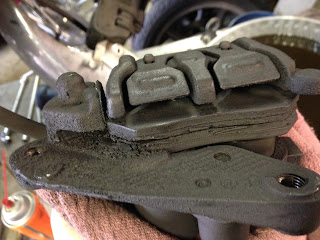
first picture is the left caliper and that was the side the seal leaked worse.
A word about skill level here. Hydraulic systems like being
clean. Don’t clean rubber parts with anything other than soapy water before
reassembly. There are lots of parts to be careful with and those include the pistons.
The pistons live a hard life. They have to move in and out under stressful
conditions. Heat, water, dust, brake dust, and sometimes, high frequency
vibration. Most of the time the degree of difficulty required to remove them
from the caliper body is inversely proportional to the overall condition of the
caliper. The dirtier and more abused it looks, including rust, the harder it
will be to remove them. A C-clamp, good air supply, air gun, penetrating oil,
and patience should be used with no discretion. These particular calipers had
mostly dirt coating the pistons, so cleaning as much as possible before
disassembly eased the process. I use an old tooth brush. Spray the entire completely
disassembled caliper with a soapy solution and rinse with hot water.
If the caliper has two pistons use a C-clamp to hold one
piston and blow air into the caliper body. If you’re lucky it will pop out. If
it sticks, use the clamp to push the piston back in a little after spraying the
penetrating oil around the piston. Back and forth…in…out…in…out and eventually
both popped out.
The piston pictured had a nick towards the outer edge. I
used a fine diamond file to remove the ridge and then a piece of worn 800 grit
with oil to polish the piston. If the piston has corrosion pits, then I would
suggest replacing the piston. I used the same piece of paper to polish the
piston and remove any baked on residue.

At this point it is extremely important to dry the caliper.
Using an air gun and a contact cleaner, blow dry and all passages. Pour new
brake fluid into the bores and rotate the caliper to insure the o-rings grooves
are coated. Carefully install the o-rings into the bores and apply more new
brake fluid to them. Using my finger, I feel the rings and feel if they are
even. Confident that they properly installed, I place the brake fluid coated
pistons into the bore and using my fingers only, I press the pistons into the
bores. This step is a touchy feely moment. If you did everything correctly, the
pistons will slide to the bottom of their bore with gentle positioning. DO NOT
FORCE THE PISTONS! If they resist then remove, inspect, relube and try again.
I finish installing the brake pads and pin holders to
complete the job. After cleaning the wheel and removing all traces of oil residue
from the brake rotors the calipers are reinstalled and the system bled.


No comments:
Post a Comment