
Lacing a rim can be accomplished by anyone, providing they have a degree of patience. Follow a pattern and proceed cautiously, success can be achieved. Rims come in aluminum and steel. They can be any size from 10” to 23”. The rules are the same for all sizes. The smaller the rim, the harder the job. The shorter the spokes, the harder the job.
First lay out all the parts and count them. 36 spoke rims are the most common. The one pictured below has 60. All rims use a series of 4 spokes (2 outside and 2 inside). The inside spokes are the first to put in. The inside spokes have to be inserted first. They may be different right and left so pay attention.
The spokes shown are for a 2003 Suzuki 1400 Intruder front wheel. There are four different spokes. The top 2 spokes with the 90 degree heads are for the rotor side of the hub. The top one is an outside and the second one is the inside. The bottom 2 spokes are slightly different from each other in length. The shorter of the two is the inside.
The spokes shown are for a 2003 Suzuki 1400 Intruder front wheel. There are four different spokes. The top 2 spokes with the 90 degree heads are for the rotor side of the hub. The top one is an outside and the second one is the inside. The bottom 2 spokes are slightly different from each other in length. The shorter of the two is the inside.


Look at the rim. The rim holes are grouped in fours. I have shown them with the nipples slightly screwed on. Put all the insides in before the outsides.

In the above picture I have put both in and out spokes in so I can locate the other side spokes. Because I had no reference point to work from I had to do this to locate the proper position for the rotor side. There are 60 holes in the rim and 30 face one direction and 30 face the other. Once you have one side in then you can locate the other side. This causes a double step because you can’t put the inside spokes through. This is shown in the picture below.

Now you have to remove the nipples from all the outside spokes so you can thread the inside rotor side spokes into the holes in the rim.
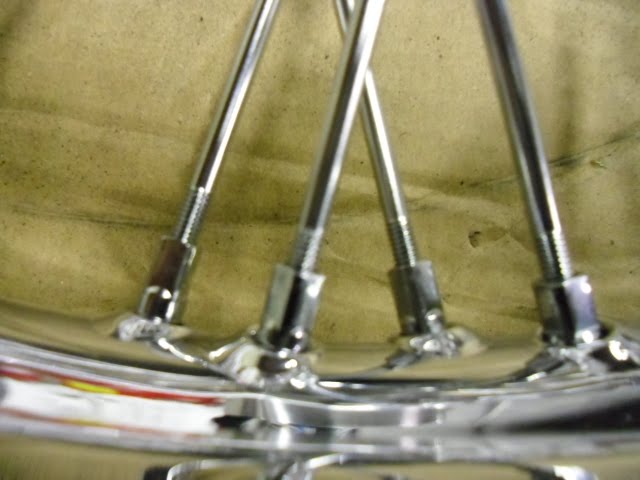
The inside rotor side spokes are in place. Now you can insert the outside spokes. Below is what it should look like.
The inside rotor side spokes are in place. Now you can insert the outside spokes. Below is what it should look like.

At this point no spokes have been tightened. The nipples have been screwed on several turns just to place all the nipples in their position. Next mark the rim, with tape, in three places 120 degrees apart. These three points will be used to align the rims radial (up & down) runout. Radial runout is done first before the lateral (side to side).

Place the wheel in a truing stand. If you don’t have a stand and can’t borrow one, then you have to be creative. You can use the axle with hose clamps to keep the hub from sliding back and forth. At each of the three points only tighten the left inside and right inside nipples. Before cranking down on them, run each nipple onto the spoke the same distance. Snug is the word. Rotate the rim and using a fixed reference point, tighten the nipples equally, a little at a time until the rim spins true on its axis. It also should be mentioned at this point to use spoke wrenches. Finding a wrench to fit the nipples is a crap shoot. Avoid using an adjustable wrench as this usually results in boogered nipples.
Continue tightening the nipples a little at a time until the side to side (lateral) runout is true. If you tighten the spokes on the right it will pull the rim to the right and vice versa. Do not tighten any spoke a lot more than any other nipple. Go slow and do a little at a time. After the rim spins true, use the spoke wrench and tap each spoke in the middle. The spoke should ring a high note. If it sounds flat and doesn’t “ping” then that spoke is loose. Use your ears and listen. It is like tuning a string instrument. The goal is have each spoke ring the same high note. They make torque wrenches to tighten spokes. I have been lacing rims for almost 50 years and have never had any issues without using one
Continue tightening the nipples a little at a time until the side to side (lateral) runout is true. If you tighten the spokes on the right it will pull the rim to the right and vice versa. Do not tighten any spoke a lot more than any other nipple. Go slow and do a little at a time. After the rim spins true, use the spoke wrench and tap each spoke in the middle. The spoke should ring a high note. If it sounds flat and doesn’t “ping” then that spoke is loose. Use your ears and listen. It is like tuning a string instrument. The goal is have each spoke ring the same high note. They make torque wrenches to tighten spokes. I have been lacing rims for almost 50 years and have never had any issues without using one


No comments:
Post a Comment